
Last updated: 23FEB2025 (see Changelog for details)
In this guide I’ll show you how to get emulation up and running on M-series (Apple silicon) Mac computers (iMac, Mac Mini, and MacBooks).
Table of Contents

Recommended accessories
Consider OpenEmu
EmulationStation Desktop Edition (ES-DE)
Add ROMs and BIOS
RetroArch
Sony PlayStation Portable
Nintendo 3DS
GameCube and Wii
Sony PlayStation 2
Microsoft Xbox
Nintendo Wii U
Sony PlayStation 3
Nintendo Switch

Changelog
Recommended accessories
You don’t meed much in order to run classic games on your Mac. The primary thing you’ll need is a controller. Standard console controllers will often allow you to connect to Macs via X-input; Xbox Series, PS4, and PS5 controllers in particular work great. If you are looking for a good retro-friendly line of controllers, I would recommend either the 8BitDo SN30 Pro or the 8BitDo Pro 2. Both have an X-input mode and will be recognized as Xbox controllers, and can generally be found for under $50.
If you are using a Mac that is constrained by internal storage (like the lowest-price Mac Mini I used in making this guide), then it might be worth grabbing a USB flash drive to store all of your ROM files. I prefer the Samsung USB-C flash drives, since they are small, reliable, and relatively cheap. The 256GB or 512GB should be perfect for most larger libraries.
Consider OpenEmu
Before we even get started with the guide itself, it might be worth considering OpenEmu as an alternative option. This is a sleek, all-in-one emulator app focused on retro systems up through GameCube, N64, and PSP. So if you are only looking to emulate a small library of classic retro games, this app is a great solution without having to dive into the weeds like we’re going to for the rest of this guide.
To get a look at all of its supported systems and other helpful hints, check out their wiki page.
EmulationStation Desktop Edition (ES-DE)
The core of our emulation experience on Mac will be anchored by ES-DE, a frontend application that will tie all of the disparate emulation apps together into a shiny package. In order to maximize our ES-DE experience, I recommend installing this app BEFORE you start with the actual emulator apps.
To get started, download the MacOS “Apple” version from their website. The first time you open the app, it will prompt you to choose where your ROM directories should be created. If you are using a flash drive, you’ll want to point to that (it will generally be /Volumes/FlashDriveName). It will then let you create your directories and you can quit the app. Now in whatever folder you designated you should see a bunch of ROM directories. You can open each of those and see a “systeminfo.txt” file which will contain information about the emulated system and which file types it accepts.
For scraping boxart, you’ll need a screenscraper.fr login, which you can get for free on their website. If you sign up for their Patreon, it will unlock faster scraping speeds.
For specific ES-DE information pertaining to Macs, check out this page from their user guide.
Note that some apps can’t be configured to work with controller hotkeys. In particular, Cemu, Ryujinx, and Lime3DS will require you to use a mouse/keyboard to exit out of your game and return to ES-DE. One option would be to use a special app to invoke keyboard commands (like CMD + Q to quit the emulator app). This blog post highlights some apps that might work in that regard, and I’ve heard that Joystick Mapper ($5) is the most compatible of the apps out there.

Add ROMs and BIOS
Now that ES-DE has created our ROM directories, we can start dragging and dropping our ROM files. These files are copyrighted and you are on your own to find them. If you are not sure which files to use, consult the systeminfo.txt file found within each ROM subfolder. Additionally, in the specific emulator sections below I’ll discuss my favorite files for each console, and any of their specific quirks.
BIOS files are system files required to make certain consoles work. The diagram above is a quick list of some of the most common BIOS files. Like ROMs, BIOS files are copyrighted, and you are on your own to find them. More BIOS information can be found here.
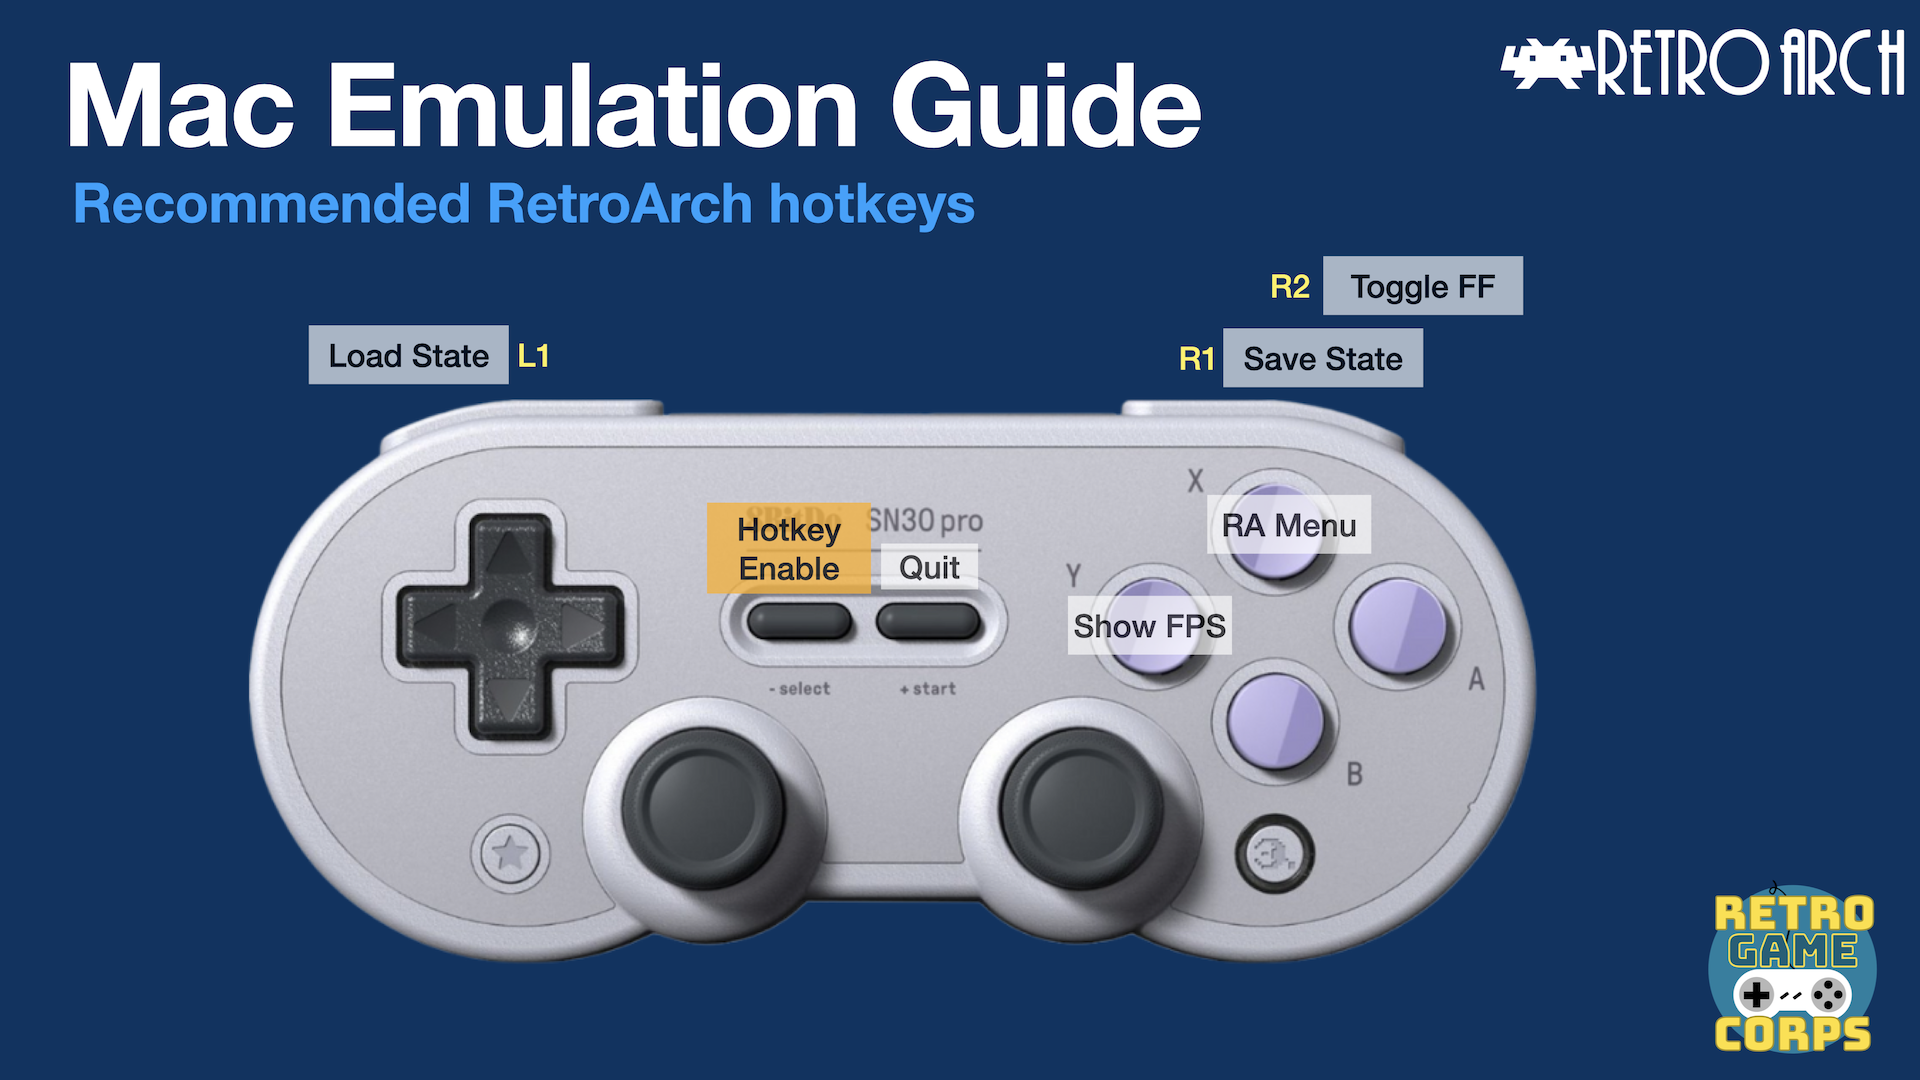
RetroArch
RetroArch covers dozens of different consoles, and it is my preferred way to play retro systems up through PS1, N64, Dreamcast, and Saturn. It has a wide range of customization but is also a little daunting. The guide video above will help you get started, but I also have a more comprehensive RetroArch starter guide if you want to get a little more into the weeds.
Because ES-DE takes care of the navigation and launching aspect of RetroArch for us, the main things you have to take care of are hotkeys and pointing the app to your BIOS folder. All that is discussed in the video above!
Recommended RetroArch cores:

Arcade (FinalBurn Neo) -- fighting games and beat'em ups
Arcade (MAME 2003-Plus) -- all-around arcade emulation
NEC PCE/TG-16/PCE-CD/TG-CD (Beetle PCE)
Nintendo GB/GBC (Gambatte)
Nintendo GBA (mGBA)
Nintendo DS (melonDS)
Nintendo NES (Nestopia)
Nintendo SNES (Snes9x Current or BSNES)
Nintendo 64 (Mupen64Plus)
Sega Master System/Genesis/CD (Genesis Plus GX)
Sega 32x (PicoDrive)
Sega Saturn (Beetle Saturn)
Sega Dreamcast (Flycast)
SNK Neo Geo (FinalBurn Neo)
Sony PlayStation (Beetle PSX)
Beyond just the cores/systems listed above, there are a ton of other classic systems you can play as well. I’d recommend checking out the Libretro Docs guide for more information about individual cores and systems (look in the “Core Library” section).
Now we’re going to cover the standalone emulator apps that I use beyond RetroArch. These are listed in order of how they are covered in the video guide above.
Sony PlayStation Portable
Emulator: PPSSPP
File type: .iso or .cso
BIOS: not required
Setting up PSP is super simple, thanks to the outstanding PPSSPP app. Simply download it, point it to your ROM location, and then go into the Settings to configure the graphics as you like. Most Macs with Apple silicon will be able to run all PSP games at 6x or higher resolution upscale.
This app has support for Retro Achievements, which you can find in the Settings > Tools section.
Nintendo 3DS
Emulator: Lime3DS
File type: .3ds (decrypted)
BIOS: not required
Lime3DS is now discontinued because the developers have moved to a new program called Azahar (which hasn’t released an app yet as of writing this guide). Thankfully, they left an archive of their app, which you can find here.
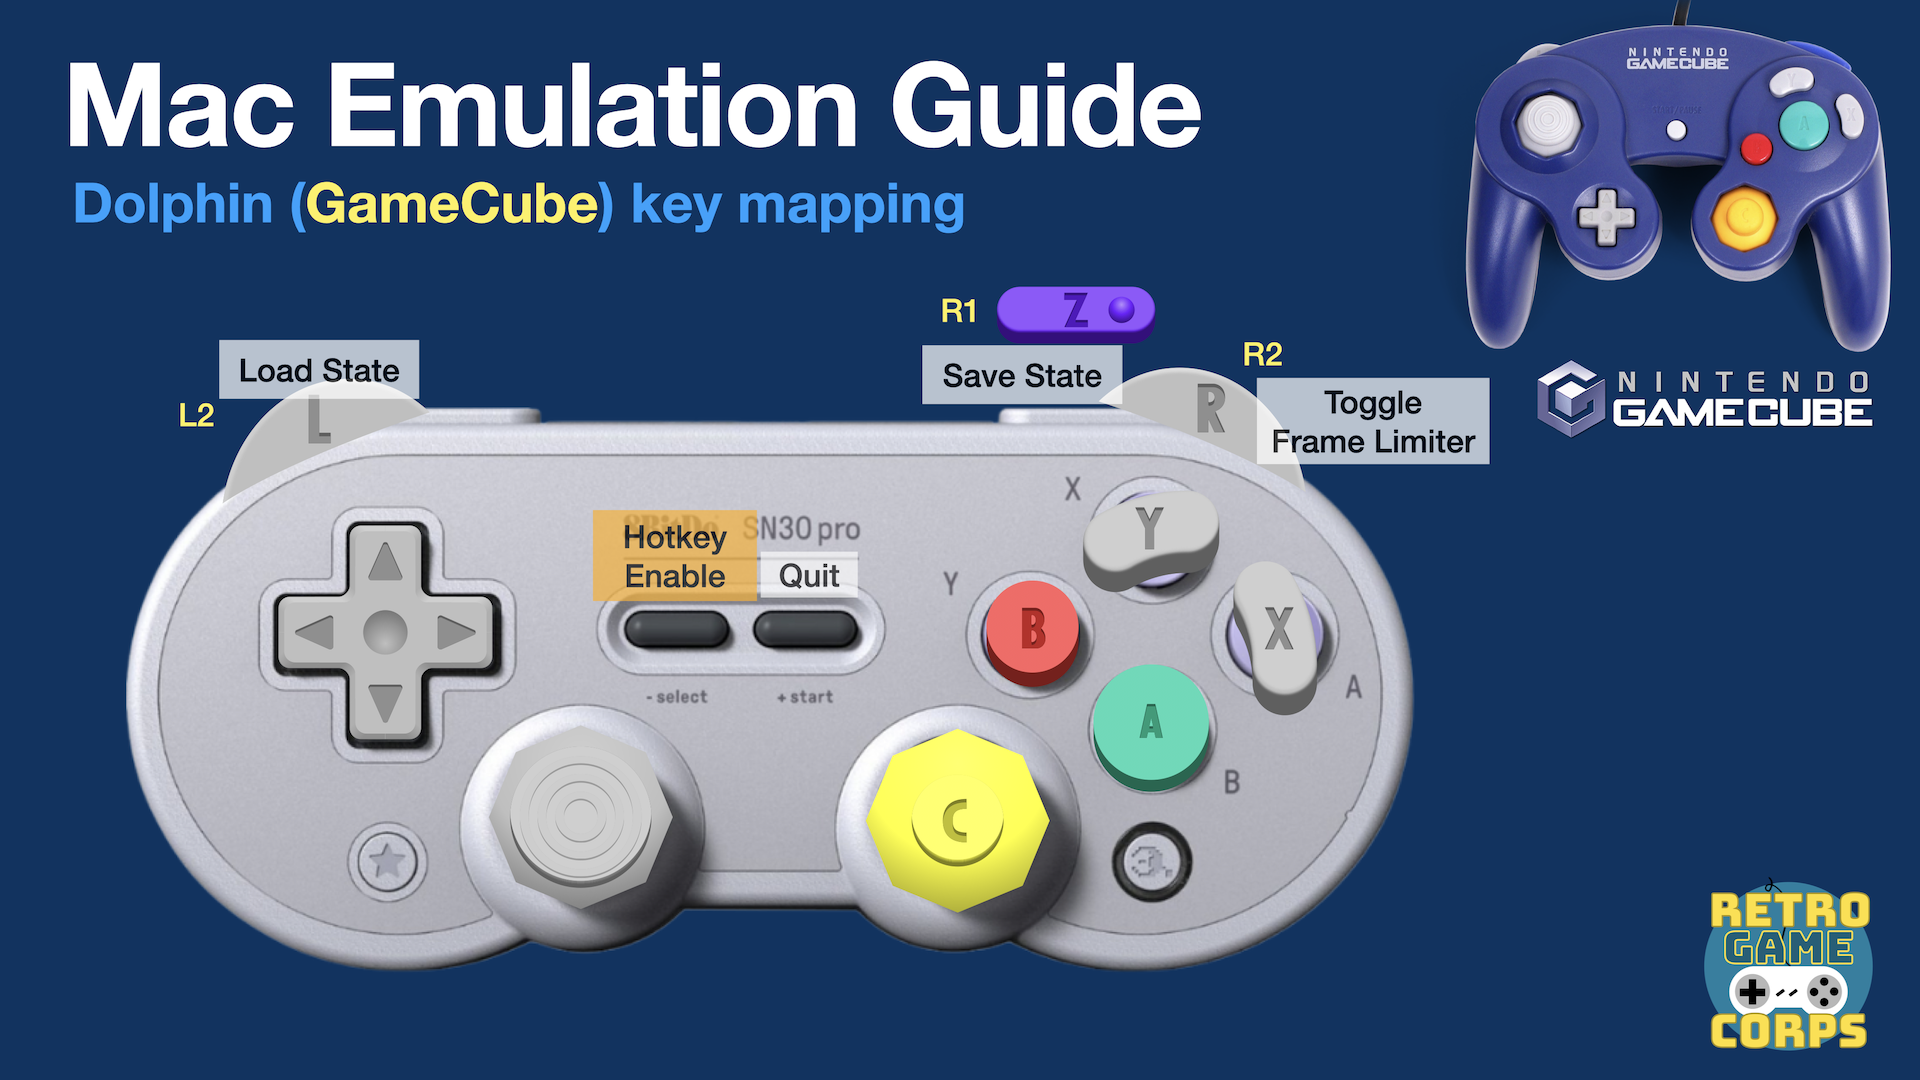
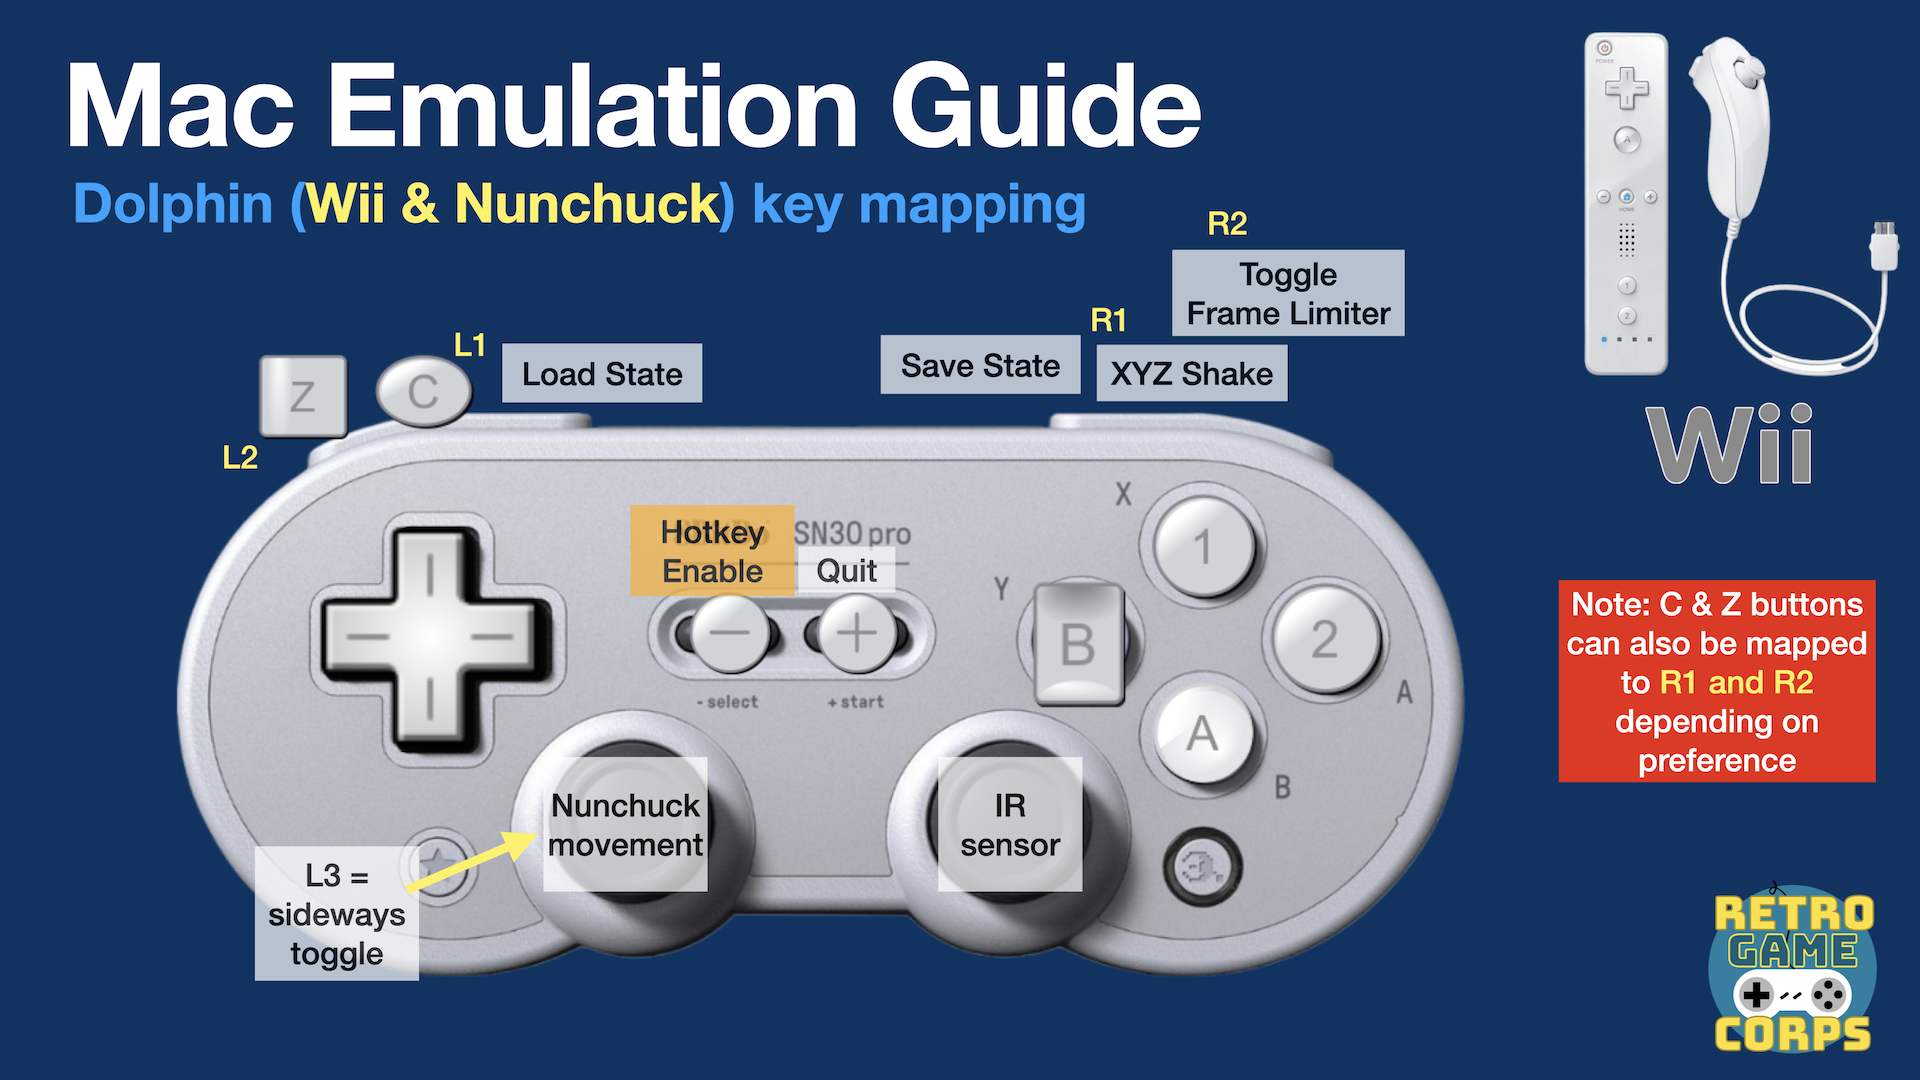
Nintendo GameCube and Wii
Emulator: Dolphin
File type: .iso or .rvz
BIOS: not required
Dolphin is available in both stable and dev releases; I generally stick with the stable releases thanks to their overall stability. Setting up the controls is usually the most challenging part of this app, but the video guide above will walk you through some of the basics. For Wii games, another consideration is to use a cheap USB Wii sensor bar and an actual Wiimote, which will pair to your system seamlessly and provide a more authentic experience. A video guide for that is below, along with a guide on how to add the GameCube boot logo to Dolphin if you’d like:
If you run into any issues with the emulator, the Dolphin guides page is super helpful.
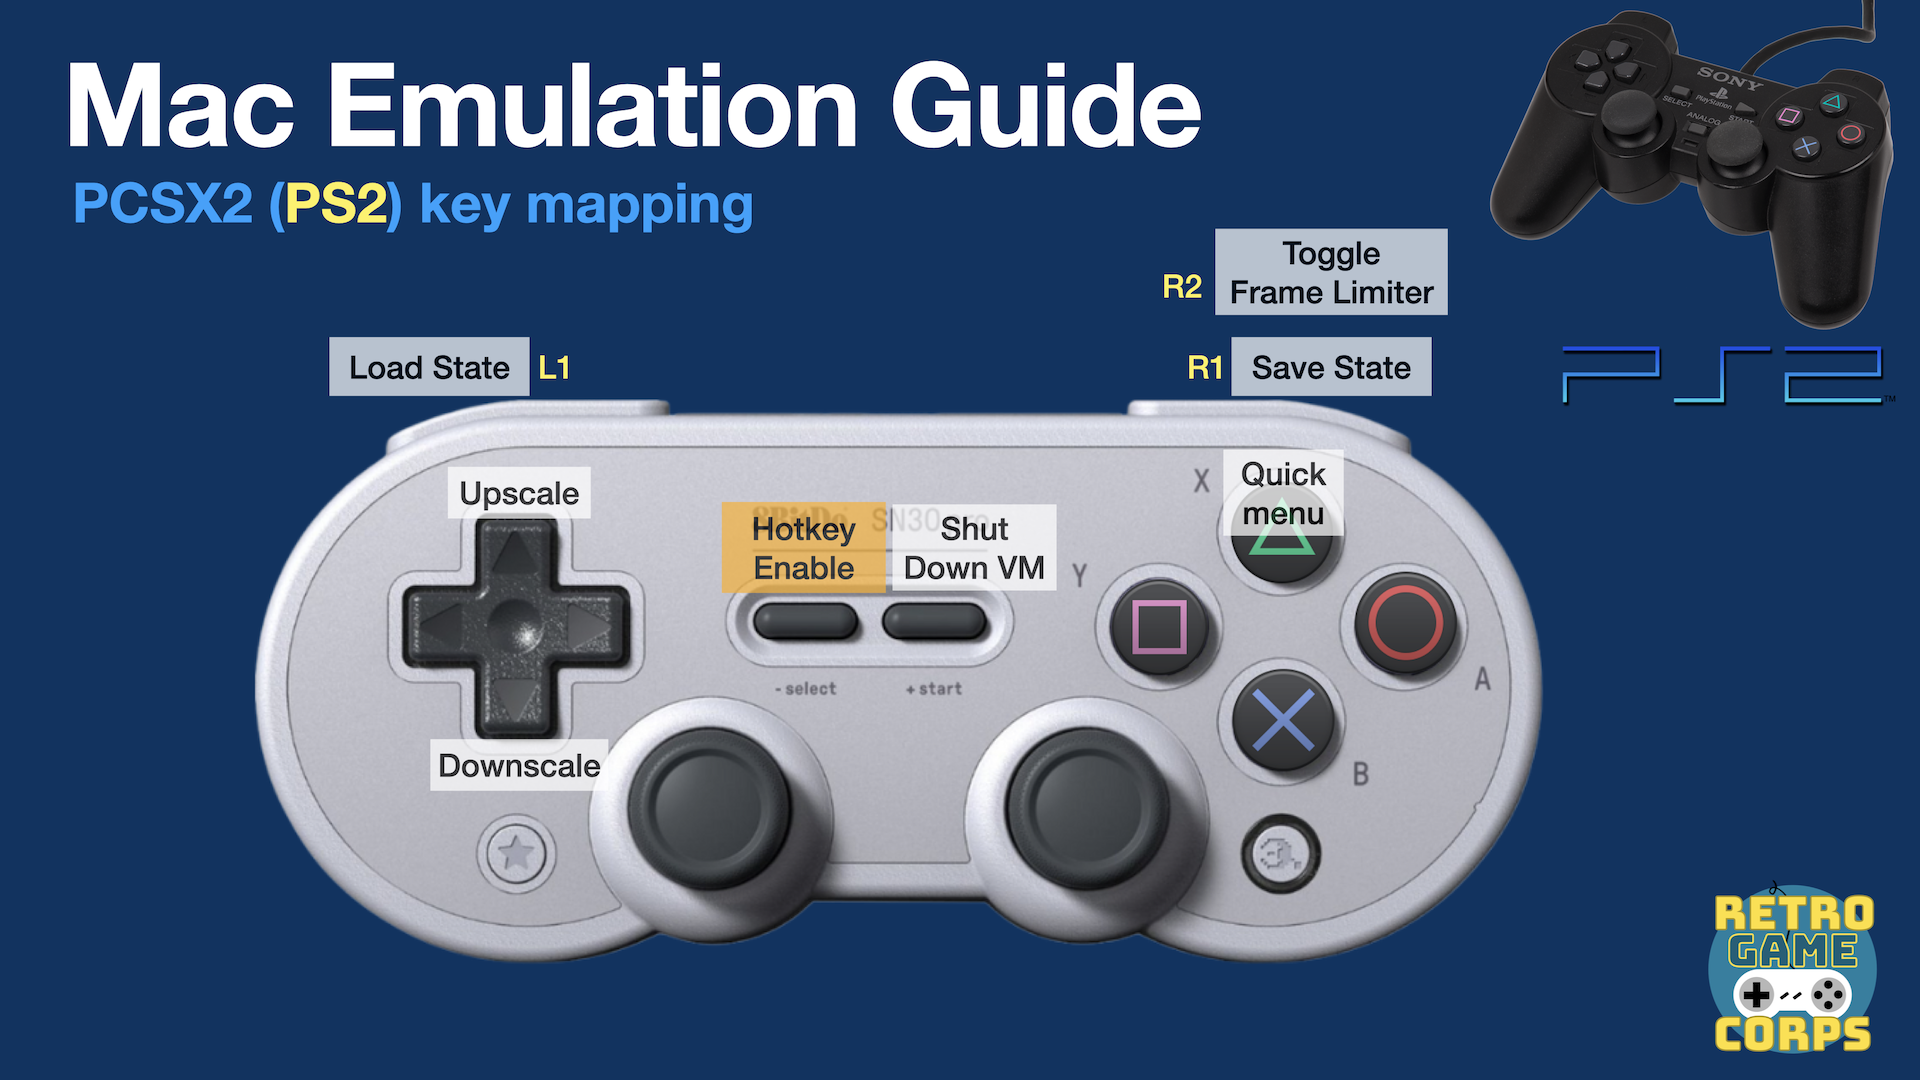
Sony PlayStation 2
Emulator: PCSX2
File type: .iso or .chd
BIOS: SCPH-70012.bin (one example of many)
PCSX2 is a feature-rich PS2 emulator that is very easy to configure. Most of the configuration can be done in the initial setup screen. If you’d like to extract your own PS2 BIOS, this guide will show you how to do that without needing a console at all. Just note that it requires a Windows PC to actually do it!
In order for this app to work properly with the ES-DE frontend, you will need to rename the app in your Applications folder to simply “PCSX2.app”.
Microsoft Xbox
Emulator: Xemu
File type: .iso (mulletted)
BIOS: mcpx_1.0.bin, Complex_4627v1.03.bin, and xbox_hdd.qcow2
Xemu requires three BIOS files. The first two are copyrighted, but the Xemu team provides a blank, copyright-free version of its HDD image at the link above.
In order to run an ISO file in Xemu, it needs to be converted to an XISO format (this process is also referred to as “mulletting”). There are several ways to do this, but one of the easiest is this webtool; simply add your ISO file and it will give you an updated file in its place. More info about this process is found here.
Nintendo Wii U
Emulator: Cemu
File type: rpx or wua
BIOS: not required (if you use decrypted files)
Cemu file types can be confusing, but I generally recommend using rpx files and converting them to wua files. The EmuDeck wiki has a good writeup on the whole thing, and my file compression guide will walk you through the wua conversion process.
Sony PlayStation 3
Emulator: RPCS3
File type: Disc dump (folder) or pkg/rap files
BIOS: PS3UPDAT.PUP
The RPCS3 quick start guide is super handy, it’ll walk you through the setup process and explain the difference between the two different file types.
Nintendo Switch
Emulator: Ryujinx
File type: nsp (digital game) or xci (cartridge dump)
BIOS: prod.keys, firmware (latest version, or one that matches prod.keys version)
Ryujinx has been taken offline but archives exist around the Internet. No direct links are provided in this guide.
Changelog
23FEB2025
– published guide
